Guide to Faster internet for SOHO units by using Extenders; Cheaper and Faster!
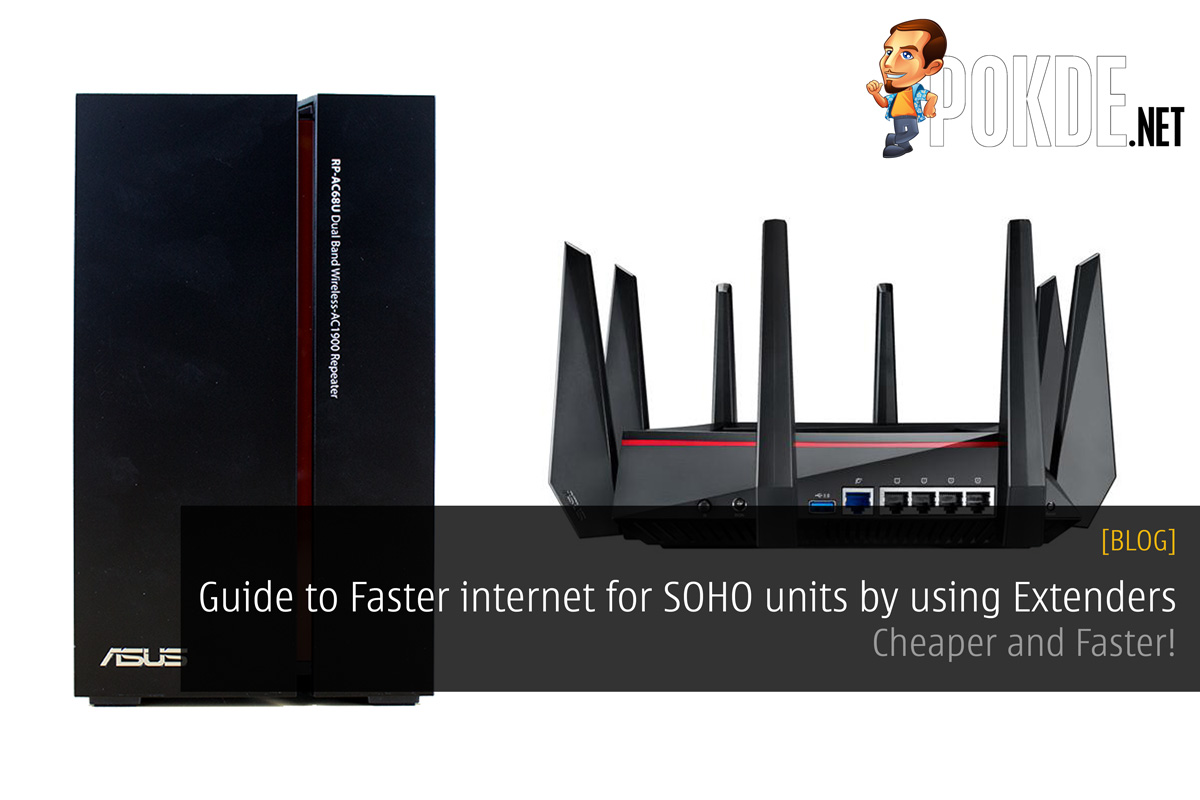
If you’re living in a Small Office/Home Office (SOHO), apartment, condominium or any high-rise building, there’s actually a huge advantage that you have up your sleeves that gives you access to faster internet without paying the extra. This can be achieved by sharing the internet between two units and opting for a higher package. Today we will teach you how to do this and the difference that you could get by doing so. There are two methods to achieve this; either using an additional Access Point in which you would need to extend a LAN cable or using Wireless Extender to extend Wi-Fi to Wi-Fi connectivity. The former is of course much preferred but we will run through BOTH methods.
I’m keeping most of the settings as default to keep this guide as layman as possible to serve the non-technical followers. I will also try to refrain from using too much technical terms and explain them where necessary. If you need technical assistance, please discuss it in the comments section so we can elaborate accordingly and not confuse the non-technical readers – for whom this guide is tailored.
What You Need
A good internet setup requires excellent hardware and while you are free to choose your hardware, we are going to use some top-notch networking devices for this:
- ASUS RT-AC5400 as our base router
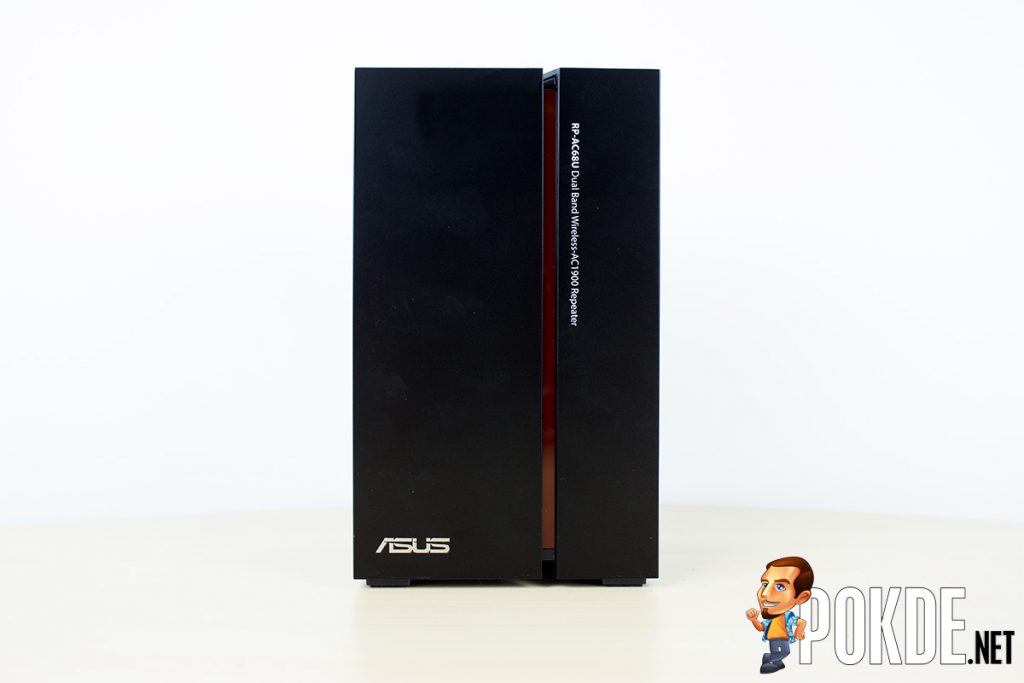
- ASUS RP-AC68U as our Access Point / Repeater
If you are expert in buying, you should be able to get BOTH of these under RM3,300. These hardware will be able to serve you even when our local internet reaches 1Gbps so it’s future ready. Apart from that, I chose the RP-AC68U extender because it will work for BOTH setups that we are achieving and honestly, it looks sexy!
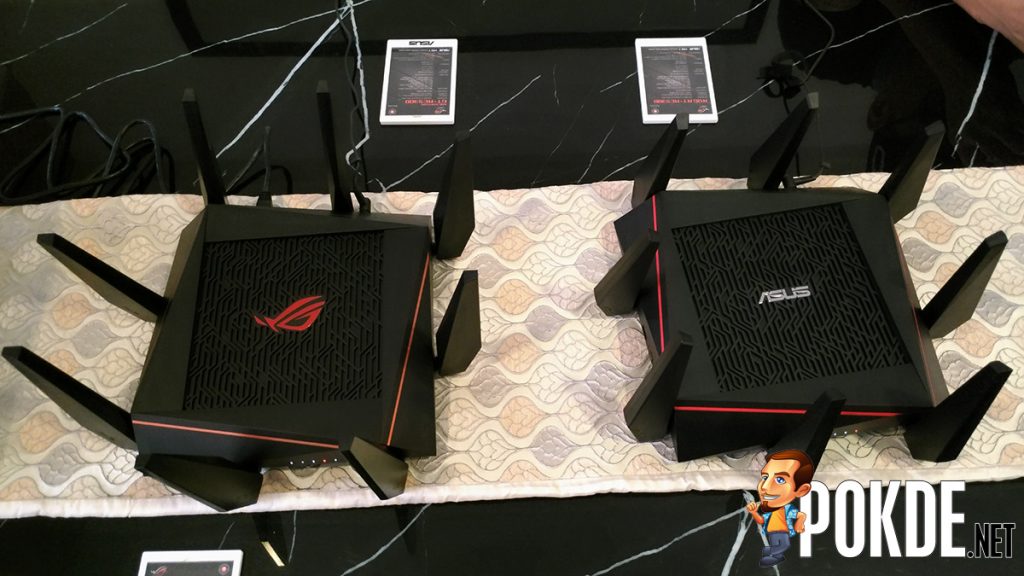
ROG Rapture GT-AC5300 (left) vs RT-AC5300 (right) – in case you have extra budget for the ROG one :P
Next, you need an upgraded internet package. In my case, my unit uses Time Fibre and I’ll be simulating a huge difference between 10Mbps and 100Mbps on the same network. For your case, if you’re using Time Fibre Home, you have options for 100Mbps that costs you RM149/mo, 300Mbps that costs you RM189/mo and whopping 500Mbps that costs you RM299/mo.
Assuming you are using 100Mbps package, upgrading to 500Mbps and splitting the bill between both units, you will literally still be paying the same amount, but multiplying your speeds up to 5 times! If you want to try 300Mbps first and settle with even lesser monthly bill, that’s entirely your choice.
Now, you can choose which method you would like to go with and select the tab accordingly. If you use the Access point method, you will need to extend a LAN cable to your neighbour’s unit which can be tedious, but since we’re talking about SOHO, it should cause less mess. If you use the Wireless Extender method, you will not need any wires, but the unit that will be housing the extender will have a very minimal ping difference – which can also be omitted still.
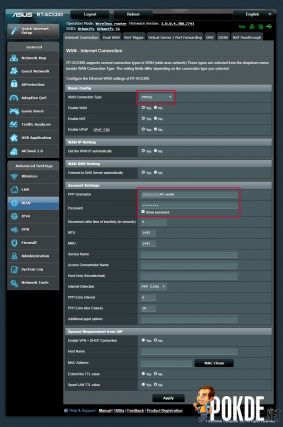
Regardless of the setup you choose, your base router will still have be configured normally (PPPoE in our network type) and you will need DHCP capabilities which your router should already have by default. In any case, I will guide you quickly in setting up your base router. You would need to access your router’s admin panel. For the ASUS RT-AC5300, you can access this via http://router.asus.com
Head over to the “WAN” page and set the network type to PPPoE and insert your username and password that was provided to you.
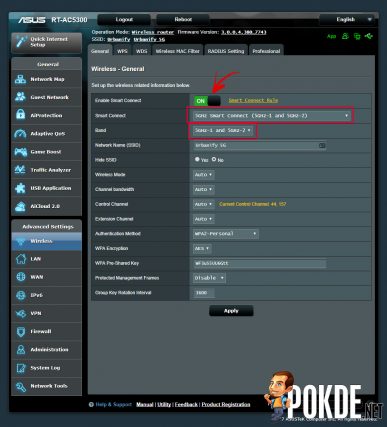
If you’re using the RT-AC5300, you have an option to enable 5GHz Smart Connect feature that will combine BOTH 5GHz using the same SSID and function as a load balanced band. This means, without you realizing, devices connected to the 5GHz band could be either connected to the first band or second band depending on the load on either one. You can also define the Smart Connect rules accordingly based on the bandwidth utilization, Physical Rate (PHY), Steering Trigger Policies (STA selection), and Received Signal Strength Indicator (RSSI) strength. This is a very interesting option that the RT-AC5300 has, but it’s entirely up to you if you want to enable it as it might slightly affect the connectivity of the extender if you’re using Wireless Extender method. If you’re using the Access Point method, go ahead, enable it and play around with the tweaks. You can enable this from “Wireless” page and selecting the 5GHz band, then enable the Smart Connect option.
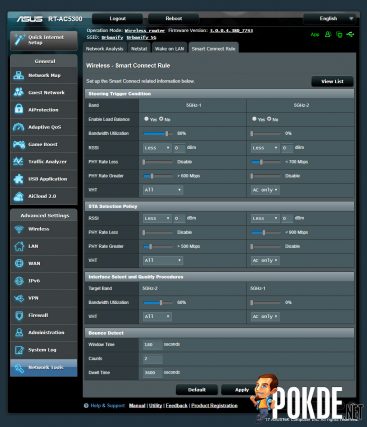
Then head to “Network Tools” -> “Smart Connect Rule” to access the plethora of settings available to you to tweak this.
If this looks to technical to you, just disable the Smart Connect feature and setup two separate SSIDs for both 5GHz bands so you can identify which band you would want to connect to. However, the load balancing will not be managed and you will have to manually switch between different SSIDs.
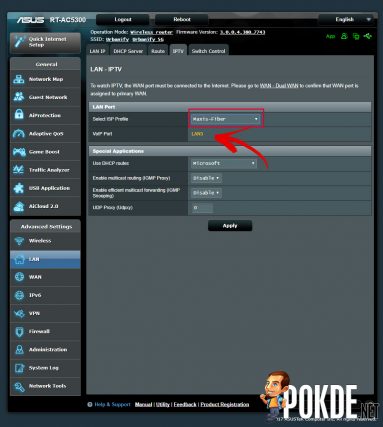
Another important thing you need to consider is the physical port that you will be connecting to. Depending on your ISP, specific ports will be reserved for IPTV and connecting to these ports will result in no internet connection. You may want to identify this and avoid connecting your extender to this port. To do this, go to the “LAN” page -> “IPTV” tab.
For example, if you’re using Maxis-Fiber, the LAN3 will be dedicated to IPTV and when you plug your extender to it, your extended internet will just not work (because the dedicated port will be assigned respective VID and have a totally different IP outside the DHCP table). With that, you’re pretty much good to go.
It’s best that you reset the extender before beginning with this guide. Turn on the RP-AC68U and hit the reset button for 10 seconds. It will revert to default altogether. If you can’t find the reset button, that’s because it’s located at the bottom of the device ;)
Now…
Access Point Method
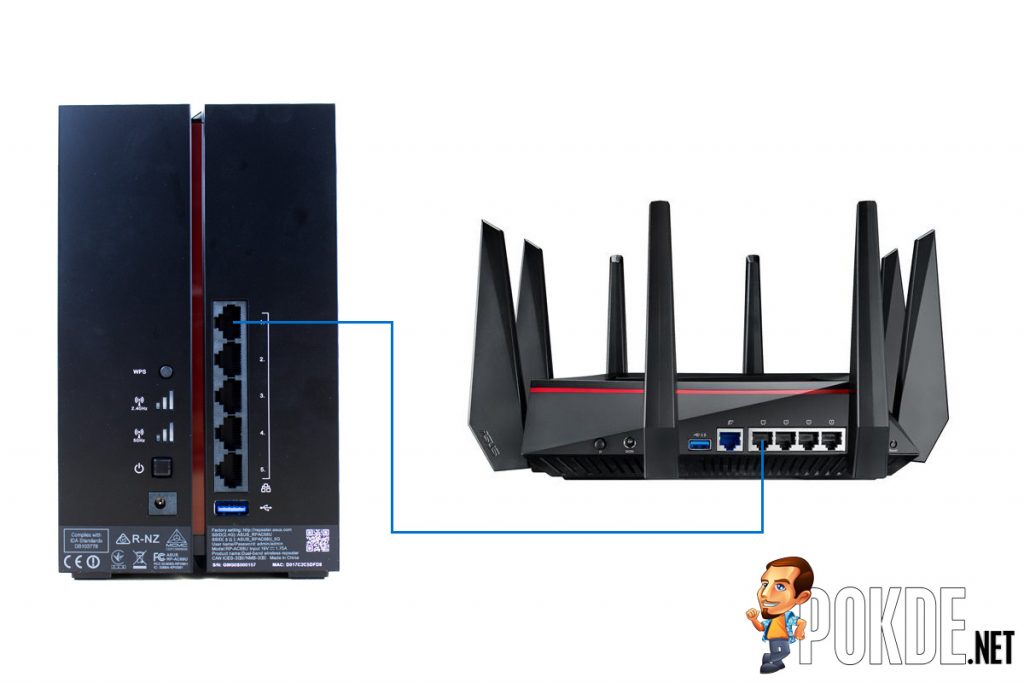
So you pick the Access Point (AP) method. In all honesty, this method is tedious in which you need to lay out an RJ45 cable. Chances are, you might have to head down to the IT store to get a long cable. If you are, get a proper one. Tell the shop that you need a CAT.6 LAN cable with 60°C 30V rating and has a 26awg composition. You can opt for a CAT.5E but since you might be hacking this cable through walls, you might want to consider future fool proof as the CAT.6 can handle higher throughput than the CAT.5E. What is important is to get 26awg at least or lower (23awg will be better if you could find it). 32awg would be too fragile to be used as a patch cable and I highly don't recommend it.
Setup Acess Point
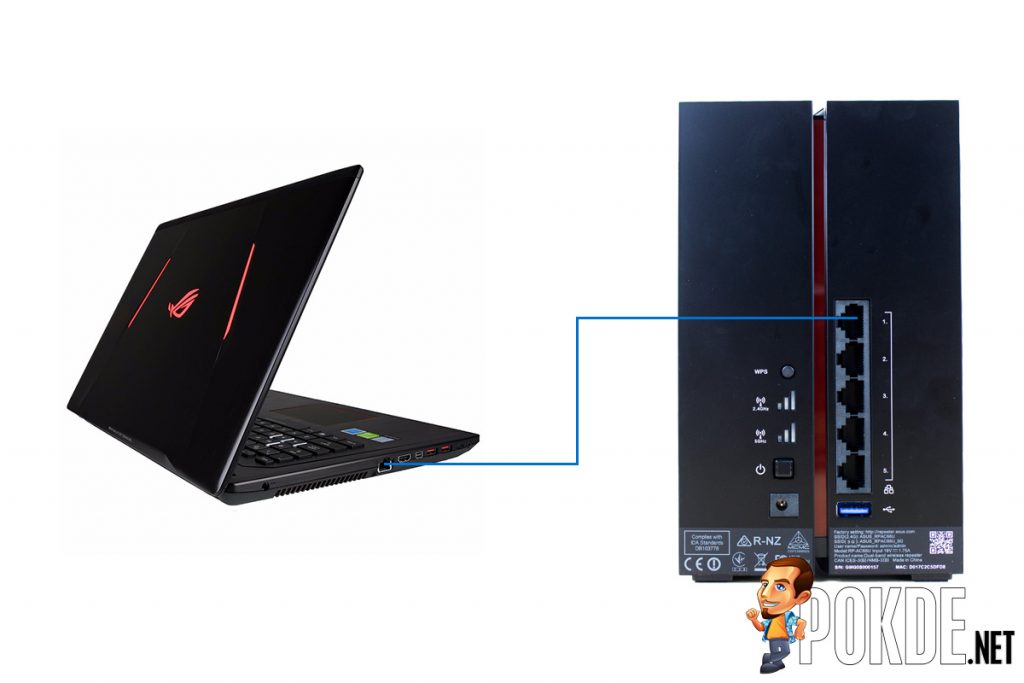
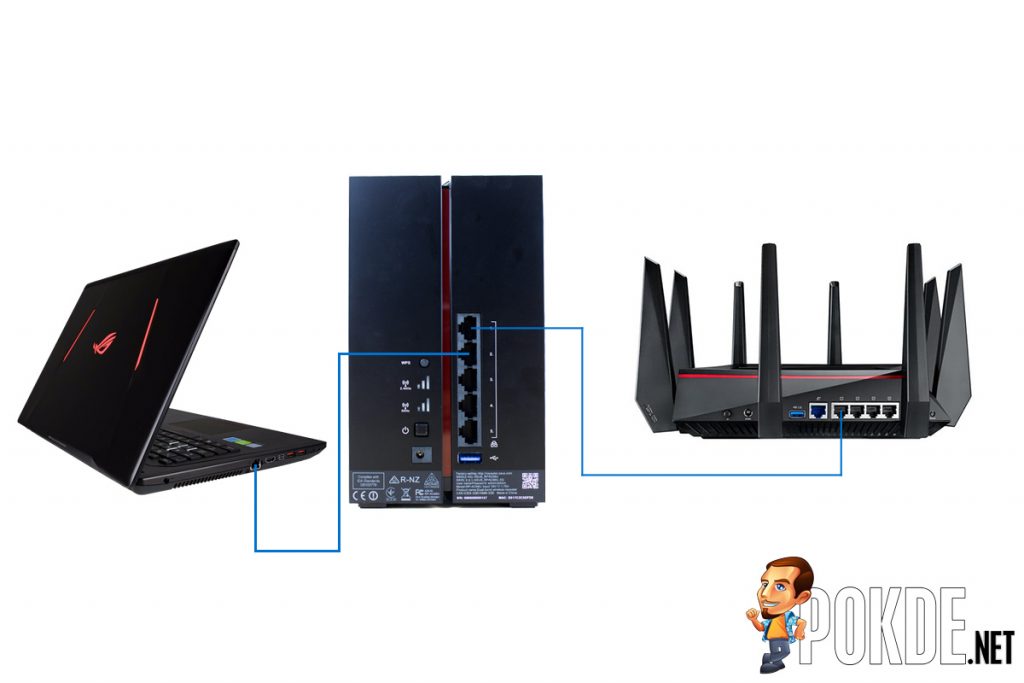
Step 1: Connect the Extender to the Notebook
No, really, only the extender and the notebook. Don't connect the extender to the router or anything else just yet, only the notebook. There's an explanation to this too. While the RP-AC68U is configured to retain the IP Address 192.168.1.120 which is also the forwarded by the URL extender.asus.com that is provided to you. But to actually access the router's admin panel, you would want to use the IP Address at 192.168.1.1 which will be the same as your base router and instead of accessing the extender, you would be accessing the router - which is not what we want to do here.
Step 2: Setup the IPv4 static address
We will need to setup a strict route to the extender by setting up a static IPv4 communication with the extender. Here's how it's done. Go to Control Panel -> Network and Sharing Centre, then select the "Change Adapter Settings" on the sidebar.
Now select your "LAN" connection, right click it and select "Properties"
Now you can either double click the "Internet Protocol Version 4 (TCP/IPv4)" or select it once and hit the "Properties" button below. You will be presented with another pop-up. Set the radio button to "Use the following IP address" and you will be able to fill in the details accordingly.
Just follow the numbers above. This is temporary and we will need to set it back to automatic later on. Remember how you got here ;) So, what are we actually doing here? We are setting the intranet IP of our laptop as 192.168.1.69 using the standard subnet and telling it that our gateway will be accessible at 192.168.1.1. Because we want our DNS to be also directed to the extender, we will use the same address as the gateway for the DNS. You don't really need a secondary DNS address for this.
Step 3: Accessing the extender's admin panel
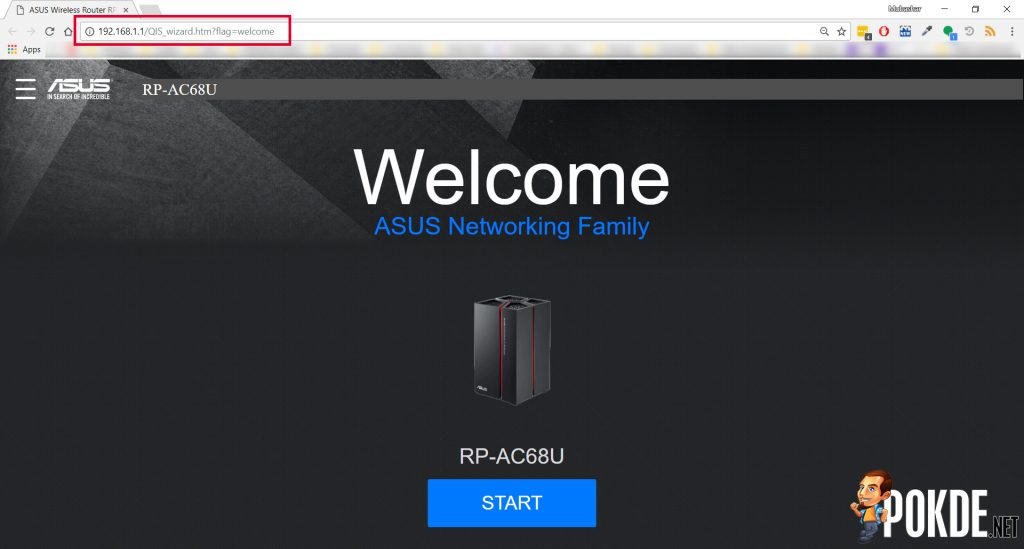
You should be able to access the extender's admin panel using http://192.168.1.1 on the laptop that you are using to configure the extender. Type that in browser and you will be presented with the following screen, to which you would want to hit "Start"
Step 4: Setup extender as AP mode
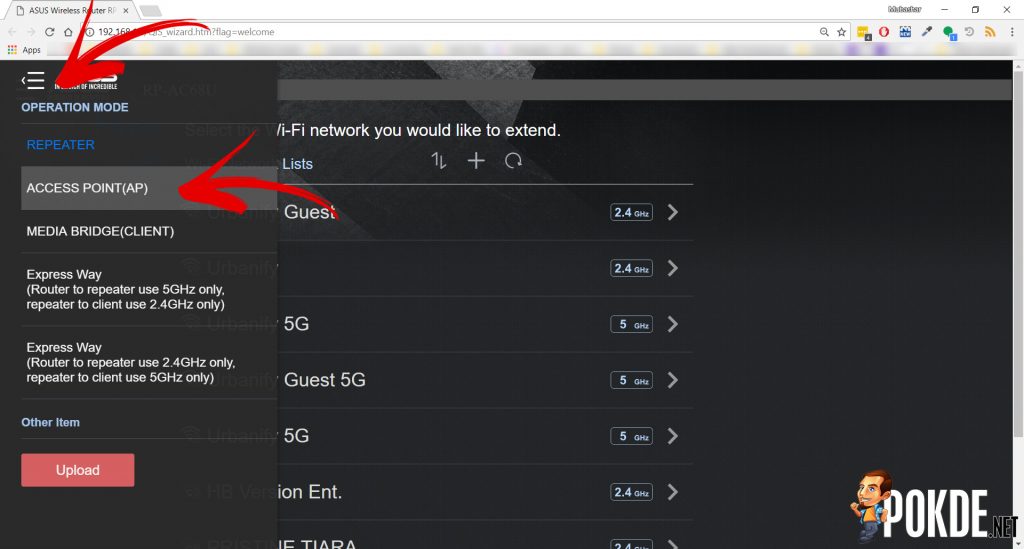
This step is important. By default, the RP-68U is configured to run as a wireless extender, but we want to utilize its Access Point capabilities. Hit the menu button at the top left and select "Access Point".
Step 5: Setup SSID for Extender
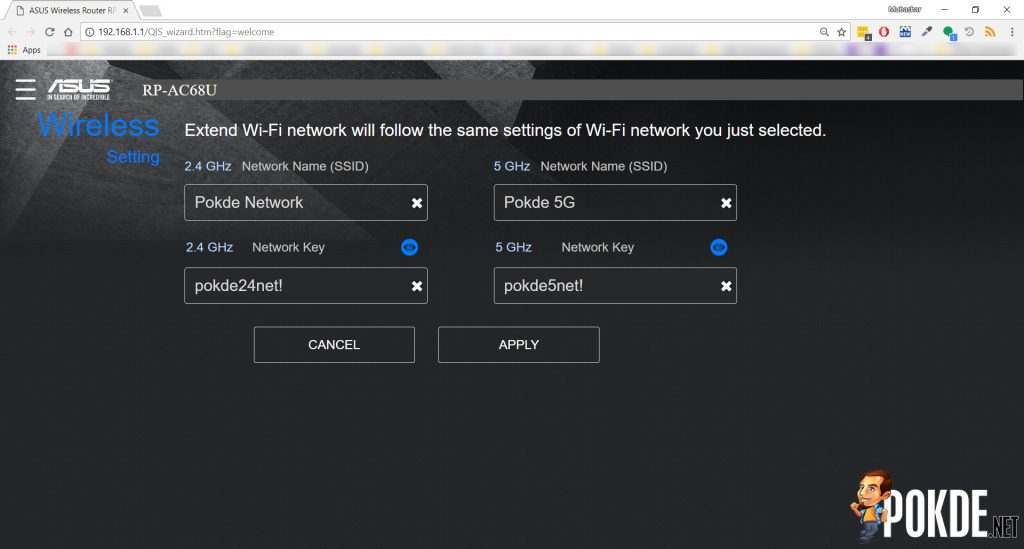
Now, you will need to setup the SSID fo the extender. You don't have to use the same SSID as the base router, in fact, since the goal is to setup extender in a different apartment unit, it's recommended to use your own preferred SSID. Here's an example of how I setup ours.
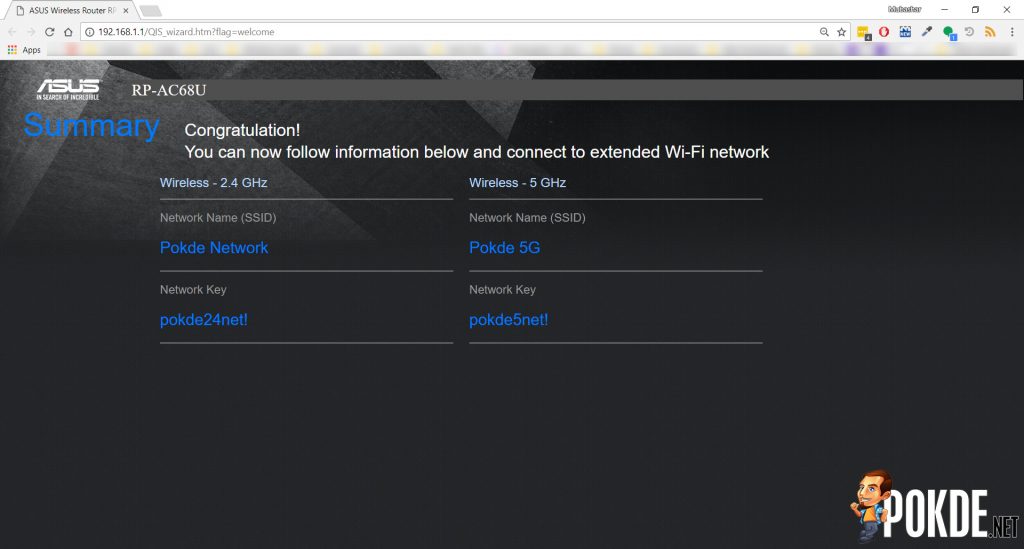
Once you hit Apply, you're pretty much done here with the setup. You may need to wait for a minute or two for the Access Point to reinitialize, before your new SSIDs become visible on your device.
Step 6: Unplug your notebook and plug the extender to the router
Now you may unplug the extender from your laptop and hook the LAN cable between the extender and the router. Because we have DHCP enabled already, there is no further configuration required on the router or extender anymore.
Now remember to set back your IPv4 settings in Step 2 to "Automatic" and your Access Point is all set to run.
You can also plug in 5 computers to the LAN port of the Extender to use have cable connectivity in your house. Just hook up the cable and you will be all good to go.
Speed Test
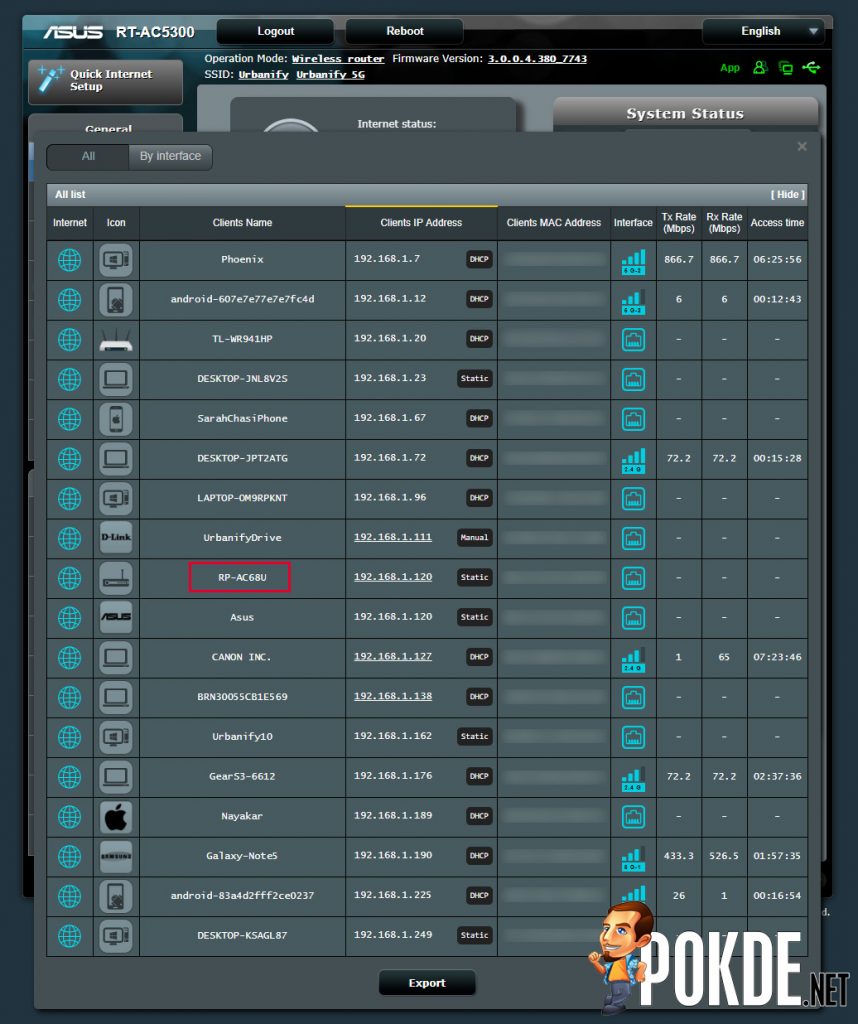
See, I'm not here to make up empty promises for you. Surely, if I let my network idle and run a speed test on a 100Mbps speed, I would get eye popping results even on extender. It's fibre internet and we don't need that. So, to spice things up, I left our users use the network as it is and let them hog the bandwidth with their usual routine. That said, on the base router, I have 17 clients connected, and our extender is highlighted in the screenshot below.
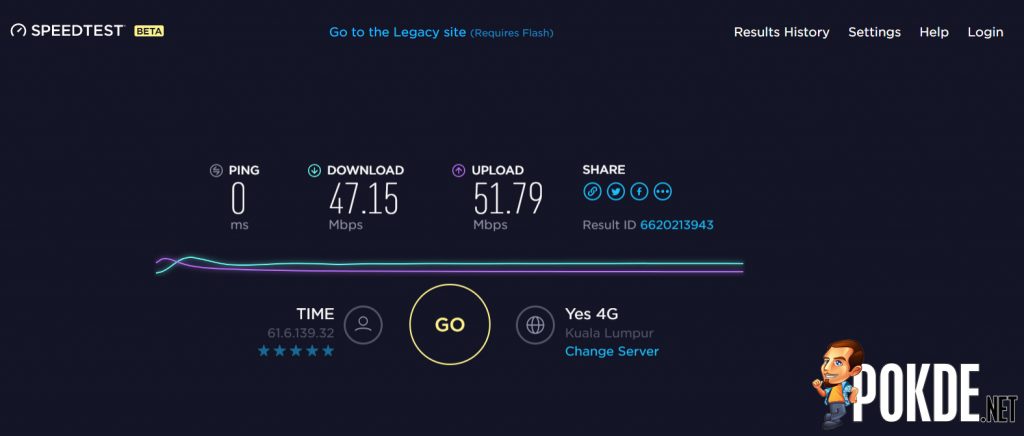
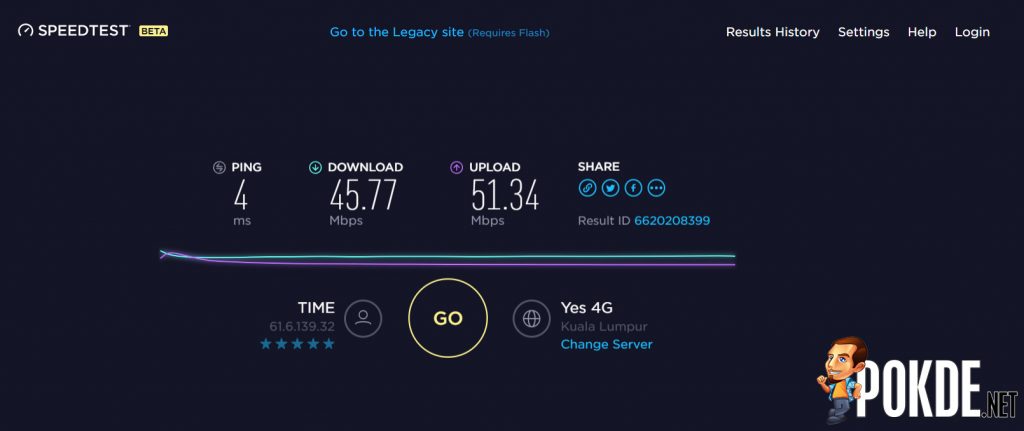
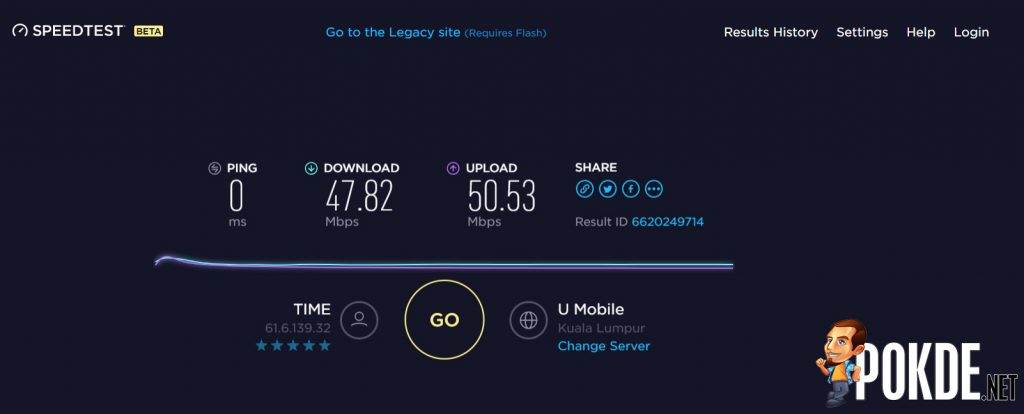
This is quite a loaded router as you can see. So to get as accurate results as possible, I ran the speed test at least 5 times each and took the lowest results of them all. Not the highest, not middle, the lowest speed captured. We had a couple of torrents running, browsing, gaming, and various activities happening simultaneously while the test was conducted. Check out the results.
Base Router Speedtest
With all the network hogging, I still managed to get half of the speed from the 100Mbps Time Fibre internet. So if you had upgraded to 500Mbps, you know what that means.
Access Point Speedtest
While the main router is being hogged, the Access Point still got very similar speeds to the base router. A couple of mbps is totally negligible when you have so much speed up your sleeves.
Wireless Extender
So, you decided to go with the Wireless Extender method because you don't want to have an ugly wire lying around? Fret not! This guide is definitely for you. Even better news? Setting up the Wireless Extender is way much easier too! Now, I hope you have reset the extender like I asked you to do earlier before beginning this guide. Let's begin.
Setup Wireless Extender
Step 1: Power up the Wireless Extender and Connect to the temporary Wi-Fi SSID
I'm pretty sure you have already fired up the wireless extender. Give it a few minutes to stabilise, then use your laptop to connect to its temporary Wi-Fi SSID.
It's quite obvious which network you need to connect to. If you have a 5GHz capable device, you will see two network SSID, in which, it's recommended to connect to the 5GHz one. You will be given a warning that there is no internet, in which you should not panic because that's kinda obvious, we have not yet setup the internet.
Step 2: Visit the Wireless Extender's admin portal
For the RP-68U, you can access this by visiting http://repeater.asus.com on your laptop that is now connected to the temporary SSID. This will show you the login page and redirect you to connect to your preferred SSID.
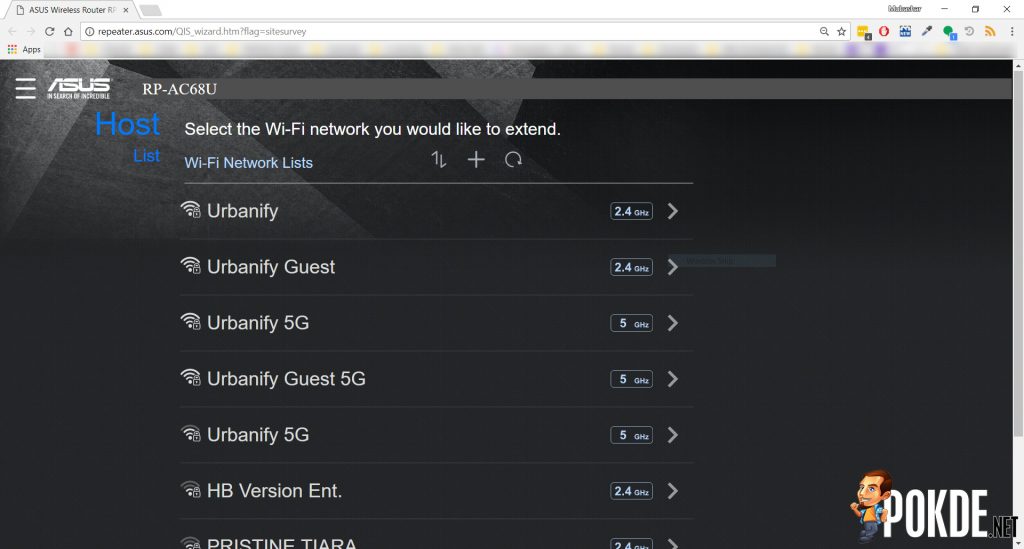
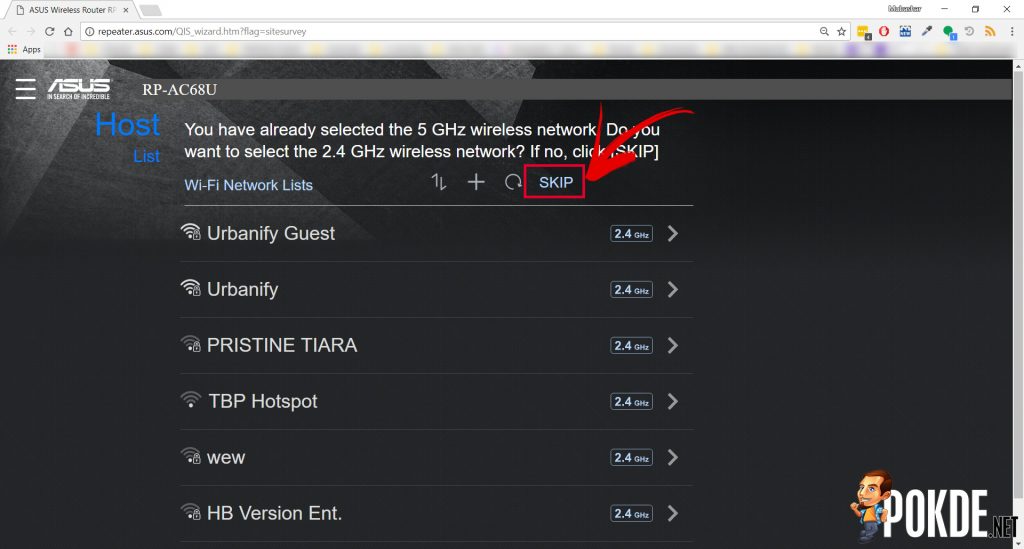
Select the SSID of your base router. Of course, it's recommended that you connect to the 5GHz network, but if you feel like the signal to your unit it not too strong, feelf ree to connect to the 2.4GHz. Once you do this, the router will prompt if you want to connect to another network, to which you should just click skip.
Step 3: Setup the SSID of the extender and connect to it
You will be prompted to enter the SSID of the extender. Feel free to setup something that is different from the base router and is unique to you.
Once you hit Apply, you're pretty much done here with the setup. You may need to wait for a minute or two for the Access Point to reinitialize, before your new SSIDs become visible on your device.
That's it! Your wireless extender is all setup and ready to deliver you high speed internet shared with your neighbour!
Speed Test
See, I'm not here to make up empty promises for you. Surely, if I let my network idle and run a speed test on a 100Mbps speed, I would get eye popping results even on extender. It's fibre internet and we don't need that. So, to spice things up, I left our users use the network as it is and let them hog the bandwidth with their usual routine. That said, on the base router, I have 17 clients connected, and our extender is highlighted in the screenshot below.
This is quite a loaded router as you can see. So to get as accurate results as possible, I ran the speed test at least 5 times each and took the lowest results of them all. Not the highest, not middle, the lowest speed captured. We had a couple of torrents running, browsing, gaming, and various activities happening simultaneously while the test was conducted. Check out the results.
Base Router Speedtest
With all the network hogging, I still managed to get half of the speed from the 100Mbps Time Fibre internet. So if you had upgraded to 500Mbps, you know what that means.
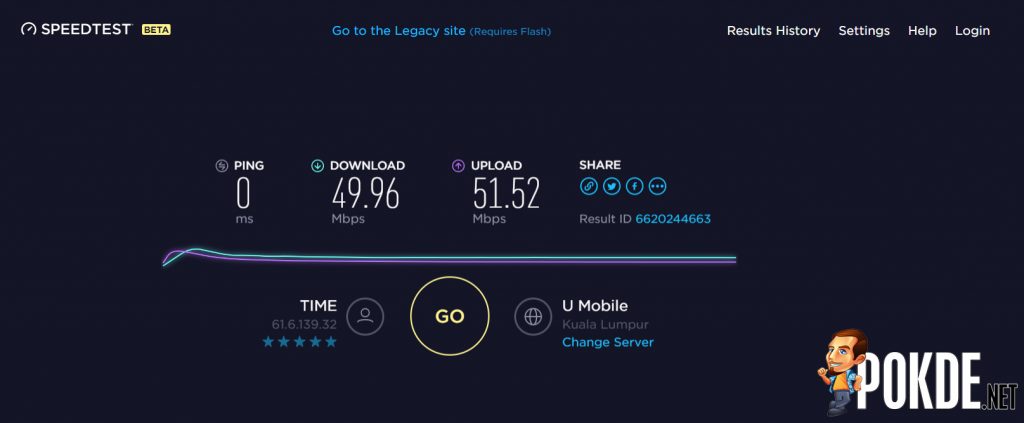
Access Point Speedtest
While the main router is being hogged, the Wireless Extender still got very similar speeds to the base router. A couple of mbps is totally negligible when you have so much speed up your sleeves.
So it seems like the speed on Access Point mode and the Wireless Extender is very similar. Then why did I recommend the Access Point method? That’s because, using the wireless extender will result in an inconsistent ping which is not something you would like if you need ping intensive tasks done on the extender, for example gaming. More often than not, the ping will spike for a while before returning back to it’s normal speed which is a matter of life and death in a game.
Conclusion
There we go. Today we have learnt how to extend our internet between two SOHO units and using a much faster internet, get higher speeds without burning our pockets. The experience is definitely remarkable. Additionally, you can always use this guide to extend the internet on the top floor of your house if you do not get good network coverage on the first (or second) floor. Just follow the steps for either methods and you will be good to go.
If you have any questions, please feel free to drop them in the comments below and I’ll be more than happy to answer them accordingly :)


















![[CES2018] ASUS Showcase Connectivity Lineup At CES 2018 – Keeping Users In Touch At Home, Office, And On The Go! [CES2018] ASUS Showcase Connectivity Lineup At CES 2018 - Keeping Users In Touch At Home, Office, And On The Go! 61](https://pokde.net/assets/uploads/2018/01/ASUS-Showcase-Connectivity-Lineup-At-CES-2018-Keeping-Users-In-Touch-At-Home-Office-And-On-The-Go.jpg)





Leave a Response